• Skip to main content

Escapology BJJ

escapologists welcome.

  • Home
  • About
    • About Tom Barlow
    • About Chelsea Leah
  • Academy
    • Take A Tour
    • Reviews
    • Classes
    • Schedule
  • Online
    • Log In
    • Students
    • Instructors
  • News
  • Free Trial

News

The most powerful submission in the world!

In my humble opinion, there is one submission position above all others that is the most powerful. I know that’s a bold statement, but it’s true.

When you slap this position on your opponent, you have a plethora of submission options to choose from, but it’s insanely difficult to escape. Even better, this submission position works just as well in the Gi, No Gi, or MMA!

So what’s this wonderful position I’m talking about? Check out the video below to learn it now…

Would you like more BJJ goodness delivered to your inbox?

Sign up for you FREE account at Escapology Online and you’ll get some exclusive instructionals, a copy of Performance Drilling, and a whole lot more.
Get your FREE Escapology Online membership now!

Filed Under: Concepts, Technique Tagged With: Kimura Trap, Reverse Triangle, Submissions

Chelsea Leah’s De La Riva Seminar

I remember the first time I experienced the De La Riva Guard. The moment my train partner set in the De La Riva grips, I knew I was in trouble. My balance was weakened, my knee was buckling, and my posture was horribly broken.

Inevitably, he swept me moments later all while chuckling to himself. It felt like some sort of Jiu Jitsu magic. However, this was the early days of BJJ in the U.K. and closed guard and half guard where still considered cutting edge positions.

Over the years, the De La Riva guard has grown in popularity, and it’s now one of the most common guards in Jiu Jitsu. Go to any competition, and you’ll see white belts to black belts using it with varying degrees of success.

That’s because the De La Riva guard is simple to set up, and offers a huge variety of attacks.

Enter Chelsea Leah…

The De La Riva guard is what Chelsea Leah taught during her recent seminar at my academy.

In case you don’t know who Chelsea is, here’s a quick bio: she’s a Black Belt under Andre Galvao, a Brown Belt World Champion, a Black Belt World, Pan Am, and European medalist, and she’s an instructor at the Art of Jiu Jitsu Academy.

Here’s a video of her beating me and some of her training partners up:

https://www.youtube.com/watch?v=aGJWNNFnTJQ&feature=emb_imp_woyt

As you can see, she has some serious Jiu Jitsu skills and she’s an excellent instructor. I want to share the whole seminar Chelsea taught with you now.

Part 1: De La Riva Control

The first area Chelsea taught was how to control the De La Riva guard. After all, if you can’t control the position, you’ll struggle to apply any techniques effectively.

Here’s part one of Chelsea seminar. The section includes basic De La Riva Control, a recovery drill, and a simple sweep.

Part 2: The Simple Way to Berimbolo

The Berimbolo has become one of the most recognised modern Jiu Jitsu techniques, not to mention a fantastic way to attack your opponent.

However, a lot of people struggle to learn the Berimbolo and give up on this technique.

Thankfully, there is a simple but very effective way to perform the Berimbolo. And don’t worry, it doesn’t require a lot of flexibility.

This simple way to set up the Berimbolo is what Chelsea shows in the second part of the seminar plus two ways to complete it.

Part 3: The Berimbolo Backup Plan

As the Berimbolo has become more popular, people have gotten very good at understanding how to defending it. That’s why you need a backup plan if your opponent defends your new-found Berimbolo skills.

And when you can effortlessly combine your attacks and counters it becomes incredibly difficult for your opponents to defend.

In the third video from Chelsea’s seminar, you’ll discover how to use your opponents Berimbolo counter against them to either sweep or submit them.

Part 4: The Knee Slide and Baseball Bat Choke

The knee slide is an excellent pass to use against the De La Riva guard as it works against the week part of the position.

When you combine the knee slide with the Baseball Bat choke you can put your opponent in a position where they’re either forced to tap or give up the pass.

This is what Chelsea’s covered in the final part of her seminar. Check it out below.

Want To Learn More Of Chelsea’s Jiu Jitsu?

While Chelsea was here she film two full-length instructionals. One on her Guard Passing strategies and one on her Guard Attacking strategies.

Both instructional’s are jam-packed with techniques and concepts that will improve your Jiu Jitsu. Here’s what Chelsea covers:

Part 1: Modern Guard Attacks

  1. The correct way to pull De La Riva and avoid being instantly passed.
  2. How to sweep your opponent over your head even if they weigh significantly more than you.
  3. What to do when the overhead sweep goes wrong
  4. Simple ways to countering your opponents pass attempts
  5. Setting up the Waiter Sweep off your opponents pass
  6. How to attack the back from the waiter sweep.
  7. Transitioning from the waiter sweep to X-Guard
  8. Combining a simple X-Guard sweep with the Leg Drag
  9. A super tight Knee Bar from X-Guard
  10. The Knee Bar / Toe Hold combination from X-Guard and why they work so well together.
  11. Using your opponents Knee Bar counter to establish the 50 / 50 guard and instantly sweep
  12. How to avoid getting caught in the 50/50

In total, the instructional runs for around 40 minutes and each technique is shown from multiple angles.

Part 2: Modern Guard Passing

  1. The essential Torreando drill to make your passing tighter.
  2. A high percent knee slide pass from open guard.
  3. Setting up the knee slide from the De La Riva guard.
  4. The Leg Weave Pass that allow to smash your partners hips to the mat.
  5. A simple position to combine the knee slide and leg weave for maximum effect.
  6. How to ‘float’ through your partner’s guard retention attempts
  7. How to set up the Inverse Leg Drag
  8. A simple pass from the Inverse Leg Drag
  9. How to use your opponents the Berimbolo to pass.
  10. Passing the near side lapel guard
  11. Passing the far side lapel guard
  12. Smashing through the worm guard.

This instructional runs for around 40 minutes and each technique is shown from multiple angles.

So how much does it cost?

Like I said, both instructionals are packed with information and could easily sell for between $77-97. However, you don’t have to pay that… for a limited time you can get Chelsea’s instructionals for only

£27

Click the button and complete your purchase to get instant access to Chelsea’s Modern Jiu Jitsu Instructional for only £27

Get Chelsea Leah’s Modern Jiu Jitsu Now!

Filed Under: Seminar, Technique

The Correct Way To Finish Sweeps

One of the most common things you’ll see in competition (particularly in the lower belts), is a BJJ player sweeping their opponent only to get immediately reversed or submitted.

However, this situation is easily avoidable providing you use the correct movement when completing your sweep. In this short video, Tom shares two ways to come up from a sweep and when you might want to use them.

If you liked this video and want more helpful tips, tricks, and techniques delivered straight to your inbox, click the button below and download your FREE copy of Performance Drilling!

Download Performance Drilling Now!

Filed Under: BJJ 101 Tagged With: BJJ, BJJ 101, Sweep

Strength & Conditioning For BJJ

One of the most common questions I get asked is “What does your strength & conditioning training look like?”  To answer that question, I’ve enlisted the help of S & C coach, Will Badenoch.

Since I started training with Will, my Jiu Jitsu specific conditioning has sky-rocketed and so has that of my students that have used him.  Will has agreed to share with you the essential elements to an effective Strength & Conditioning programme.  Enter Will Badenoch…

Programme Design Basics

Programme design is not fancy, you won’t see it in YouTube videos or magazine articles but it’s essential for a successful training programme.

For most Jiu Jitsu players, two strength and conditioning sessions a week should be plenty. Anymore may not give your body time to recover and will negatively affect your overall performance.

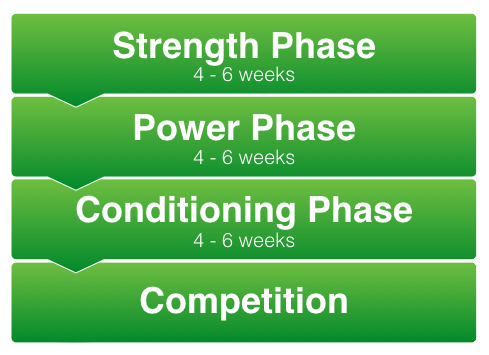
I also suggest following a basic linear periodisation model that includes different three phases.  Periodization is basically planning your training so you’re in the best condition possible at the time of a competition or event.

With any plan it is important to start with a general preparation and strength development phase. We will then follow this with a Power development phase and conclude our cycle with a conditioning phase.

Phases Of Strength And Conditioning Programme

Each phases will normally last for 4-6 weeks depending on the athletes needs. The cycle is then repeated throughout the year.

It is also possible to only have two phases strength followed by power.  However, this would heavily depend on the competition schedule and conditioning of an athlete.

Phase #1: Strength

Improving your technique should always be your number one goal, no matter what your skill level.  However, the existence of weight and age categories competitions are a testament to the importance of strength in the Jiu Jitsu.

A weak fighter with great technique fighting a strong opponent with good technique runs the risk of being out-muscled and defeated. These two fights are great examples of this

Rafael Martinelli vs Paulo Miyao – Copa Mestre Deo JJ 2014

Gabi Garcia vs Mackenzie Dern – European Championships 2015

Simply put, a stronger muscle will find it easier to move an object, it’ll be able to do it faster, and use less energy doing so.

For example, a 70-kilo athlete, who can only deadlift 60 kilos, will be working very close to their maximum strength capacity to complete a takedown.  If that same person increased their deadlift to 160 kilos they’d require only a fraction of their total strength to perform the same movement, saving themselves a huge amount of energy.

A stronger muscle can also act as ‘armour’ protecting the joints from damage and prolonging the career of the athlete.  As world renowned Strength coach, Mark Rippetoe, said:

“Strong people are harder to kill than weak people and more useful in general.”

So now you understand the importance of strength, how can you develop it?

For all my athlete’s that need to improve their strength, I use this simple 6-part workout structure:

1. Mobility, Activation, and Warm Up – The goal of this is to prepare your body for the workout ahead.

2. Priming Circuit – This ‘fires up’ the neurological system ready to achieve maximum force.

3. Main Strength Exercise – This is where the work begins. I’d advise on one of your strength days using a squat variation and the other a deadlift variation.

The squat will build more leg, hip and core strength than any other single exercise. The deadlift works more muscles throughout the body than any other exercise, in particular, the glutes, hamstrings, back and grip

4. Whole Body Circuit – Chose supplementary exercises to mimic the demands of your sport and give you a complete workout.

You can take this opportunity to incorporate some single leg and single arm movements to balance your body and increase core involvement.

5. Core Work – Strong core is essential for efficient transmittance of force. A weak core will sap your strength and could lead to injury.

Your core will already be fatigued from the previous sections of the workout, so core work can be included with section 6.

6. Whole Body Finisher – This section will start to build your conditioning. However, the rest of the workout can be quite challenging so this section is optional.

This may seem like a lot, but in my experience, your workouts should take less than an hour to complete.  As you can see, the workout is actually very simple, but can be very challenging.

Each workout you should look to increase the weight or number of reps on each exercise, which will lead to continual strength improvements.  There is no need to change the exercises every week as it takes on lease six workouts for your body to adapt.

I recommend most people add two strength session a week for around 4 – 6 weeks before moving on to the power phase.  Remember these strength sessions are to supplement your training not replace them.

Phase #2: Power

A ‘strong’ person who lacks power is like a car jack.  They’re capable of moving incredibly heavy objects, but only at slow speeds.

On the flip side, an extremely ‘fast’ but weak athlete is like a bow and arrow.  They’re capable of moving light objects (like an arrow) at high speeds, but lack the strength to shoot anything heavier.

A dangerous fighter is able to combine both these qualities and apply their maximum strength in a fraction of a second.

The training methods used to become both strong and powerful are by no means mutually exclusive.  On the contrary, getting stronger will lead to rapid gains in power as you train the muscle to work more efficiently and ‘turn on’ quicker.

However, it’s important to understand the difference between the two so you can understand the reasons behind the training techniques you’ll use to improve your ability in these areas.

The aim of your strength and conditioning training will not be to produce huge energy sapping muscles, but rather to maximise the efficiency of those muscles you already have.

Although an improvement in muscle tone and size is almost inevitable, so you’ll look good on the beach with no extra effort.

To help you to understand how this is possible, here’s a basic description of the mechanics involved.

Each muscle is made up of hundreds of muscle fibres.  When you perform an action, such as shooting for a takedown, a signal is sent from your brain to the muscles required to perform that action, telling them to ‘switch on’ and contract.  The speed and force of that movement will depend on the number of muscle fibres that are recruited by the signal sent from your brain.

Kettlebell_Workout b&w

No one can voluntarily recruit or ‘switch on’ all of the fibres in a muscle at once under normal circumstances. This is a protective mechanism designed to prevent muscle damage.

You may have heard stories of people thrown across rooms by electric shocks.  In this case, the electricity has not ‘thrown’ the person but has acted in a similar way to the electric signals that travel from your brain to your muscles when you want to move.

With an electric shock, however, the safety mechanisms are effectively overridden. When the shock is received the leg muscles suddenly tense up and every muscle fibre is switched on, contracting rapidly and forcefully, effectively causing the recipient to ‘jump’ across the room.

This example illustrates the massive strength and power potential contained within the muscles of even an untrained person, and should help you understand how you can increase your strength without increasing your size or weight.

An untrained person will be able to recruit no more than around 60% of their muscle’s potential strength voluntarily.

By training with heavy loads at slower speeds, you’re can train your muscle to ‘switch’ on more of its fibres without damaging them and tap into strength reserves that were previously unavailable to you.

By also training with lighter loads at higher speeds you’re able to teach these stronger muscles to contract extremely quickly, giving you the strength of the car jack with the speed of the bow and arrow!

So, how can you develop power?

Each power workout will be broken into six sections similar to the strength phase.

1. Mobility, Activation, and Warm Up – The goal of this is to prepare your body for the workout ahead.

2. Jumps and Throws – Choose one lateral and on linear jump variation and pair it with an explosive medicine ball movement.  For the first few weeks, I’d advise using only your body weight, as you progress you can start to add weight.

3. Main Power Movement – In this section, you should choose one hip dominant and one quad dominant power exercise, such as Jump Deadlift (hip) and Speed Squat (quad).

These should be lower under control and raised as fast as possible.

4. Whole Body Power Circuit – This will be similar to the strength circuit except using power exercises.

5. Core Work – A Strong core is essential for efficient transmittance of force.  Your core will already be fatigued from the previous sections of the workout, so this section can be included with section 6.

6. Whole Body Finisher – This section will continue to build your conditioning and can be used to maintain your strength.  The rest of the workout can be quite challenging so this section is optional.

Power workout’s don’t have to be long, but every rep should be performed at maximum power, and this can be very tiring.

I would recommend adding two power sessions a week for around 4 weeks before moving on to the conditioning phase.

Each workout you should look to increase the weight or number of reps for each exercise.  If you perform them correctly you will experience a dramatic increase in Power.

Phase #3: Conditioning

Technique, strength and power are all valuable tools in your arsenal, but without ‘sport specific fitness’ or conditioning they’ll be rendered useless very quickly.

A poorly conditioned fighter with great technique, fighting an opponent with good technique and great conditioning runs the risk of being dominated in the later stages of the fight.

As legendary wrestler Karl Gotch said, “Conditioning is your greatest hold.”

However, sports specific conditioning is probably the most misunderstood and potentially problematic area of training.

Much of what has become common practice for conditioning has been taken from the circuit style training videos popularised by fighters in YouTube videos.  The problem is, the sessions that make it onto YouTube are generally the most interesting NOT the most sensible, and will only make up a fraction (if any!) of a fighters training programme.

I’m a firm believer that the best way to condition for any sport is by doing the sport.  Every time you step onto the mat you are conditioning yourself.  That said you can complement your on-mat conditioning in the gym.

During this phase I recommend using two different workouts; a Power Endurance Circuit and an Interval Training session.

Day 1: Power Endurance Circuit

This session will be relatively short but highly taxing. The aim of the session is to build your strength and power endurance. The structure is

1. Mobility, Activation, and Warm Up – The goal of this is to prepare your body for the workout ahead.

2. Jumps and Throws – Choose one lateral and on linear jump variation and pair it with an explosive medicine ball movement.  For the first few weeks, I’d advise only using your body weight and as you progress you can start to add weight.

3. Circuit – Select 3 big strength or power movements (1 upper body push, 1 upper body pull and 1 lower body). Perform 3 explosive reps on each exercise before moving onto the next.

Limit rest between exercises to 10-20 seconds and repeat the series for 6-10 minutes depending on your level of conditioning and match length.

Day 2: Interval Training Circuit

The aim of this session is to develop your aerobic capacity alongside your ability to explode on demand while fatigued. The structure is

1. Mobility, Activation, and Warm Up – The goal of this is to prepare your body for the workout ahead.

2. Jumps and Throws – Choose one lateral and on linear jump variation and pair it with an explosive medicine ball movement.  For the first few weeks, I’d advise using only your body weight and as you progress you can start to add weight.

3. Interval Circuit – Push your heart rate into the aerobic training zone using a low-intensity exercise such as skipping, then spike it for short bursts using the much higher intensity exercises.

The session should last for 30-50 minutes of continuous activity, depending on your current levels of conditioning.

Remember these are supplementary training sessions and most of your conditioning should come from your Jiu Jitsu training. This phase should last for 4-6 weeks and finish just before your competition.

The conditioning phase completes a full cycle of your strength and conditioning programme.

You will have seen your physical capabilities skyrocket but don’t stop there!  After taking a short rest break go back to week 1 and get stuck back into the programme.

The second time through you’ll be familiar with the system, practiced at the exercises, and capable of pushing yourself harder.

As a result expect to see even more dramatic results with each cycle!  Look back over your training log as you go and aim to beat the weight and rep records you set previously each week.


Get Performance Drilling Now

Want more great BJJ content delivered straight to your inbox? Click the button below to download your FREE copy “Performance Drilling” and join our exclusive newsletter:

Download Now…

Filed Under: BJJ 101 Tagged With: BJJ Workout, Strength and Conditioning

Four Solo Drills To Help Improve Your Guard

One of your greatest weapons in developing a killer guard is flexibility. The more flexible you are, the easier you’ll be able to transition in and out of attacks, and the less your opponent will be able to force you into positions you aren’t comfortable in and exploit the gaps in your guard.

The nice thing about flexibility and mobility is you don’t need a training partner to develop it. You can develop your guard anytime, anywhere through a little solo drilling.

To help you get started here are four of my favourite solo drills to help improve your guard. These drills have been incredibly beneficial in my own training, hopefully, they can do the same for you.

Try these stretches and tactics out for the next 30 days and see how they help you.

Want more great BJJ content delivered straight to your inbox?

Get Performance Drilling Now

Click the button below to get your FREE copy of Performance Drilling and discover how to train like a world champion.

Get The FREE eBOOk

Filed Under: BJJ 101 Tagged With: Flexibility, Guard Retention, Mobility

  • « Go to Previous Page
  • Page 1
  • Interim pages omitted …
  • Page 12
  • Page 13
  • Page 14
  • Page 15
  • Page 16
  • Interim pages omitted …
  • Page 49
  • Go to Next Page »

Copyright © 2025 · Gymdesk · Privacy Policy · Terms · Safeguarding · Contact · Log in